


I made my first swing (flap card) for my dear friend Shirley's birthday and it was not near as hard as I expected, it was quite fun. I used a stamp Friends designed by Maybelle RO and paper pieced the outfits to match my background papers and die cut butterflies to coordinate. The inside saying is hard to read, it says "Wishing you every stamp you could ever want and then one or two more. Happy Birthday.
Let me try to give you directions. Cut your cardstock to 7 1/2 " x 5 1/5 " (4 1/4" if you prefer, depends on the size of your die and design) Scor the 71/2 " length at 2 3/4 " and 3 1/2".

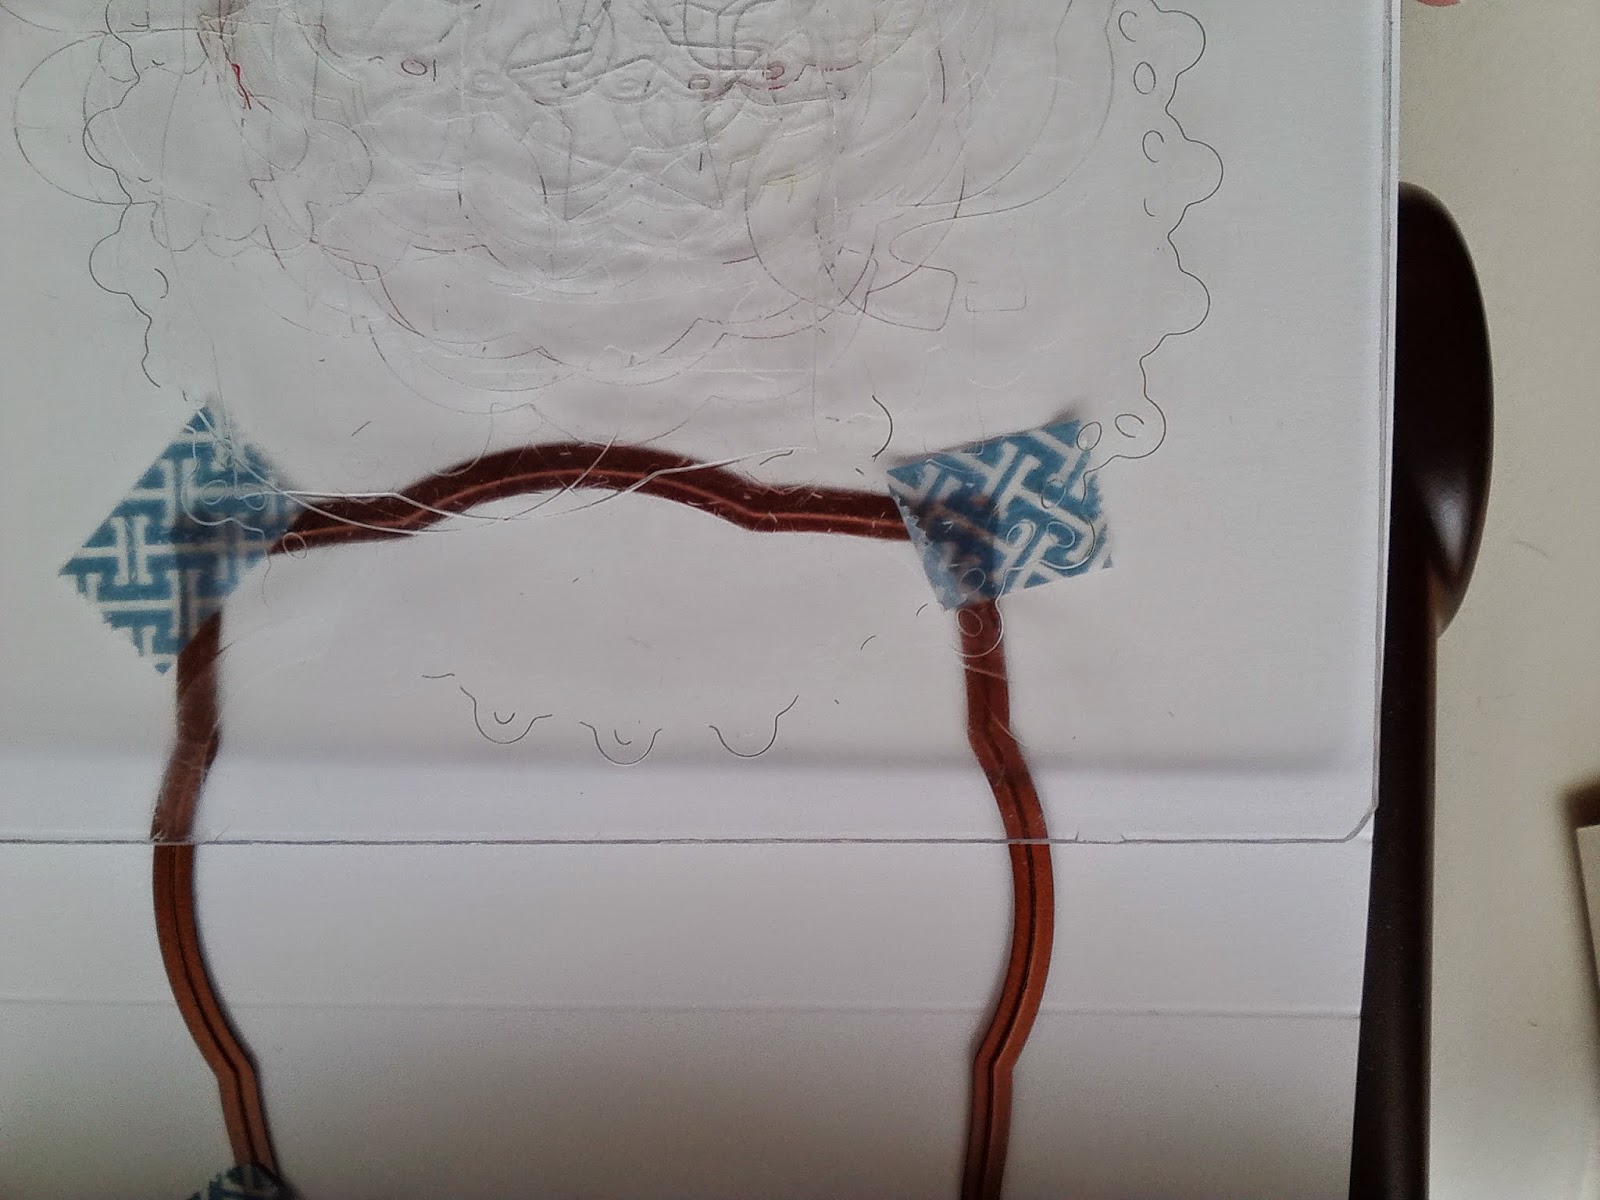

Position die of choice (Spellbinders Labels 3)as above and attach with removable tape or Washi tape. Position cutting board 7 1/2" length ONLY to the 2 34' fold line and roll through your Big Shot or Cuddlebug. Repeat going from the opposite side to the other score line. Note you will have a 3/4 " strip not cut as as in the finished example above. Fold as below. For the front flap, cut a colored or pattern piece and a smaller solid piece for your design and a solid piece for the back for your greeting. Embellish with stamping or patterned paper, and other die cuts (Butterfly) or other embellishments of choice. Enjoy and let me know if you try this so I can see your creations!

Challenges:
Die Cuttin' Diva's 178: Favorite Color Combination
DRS 135: They Say its your Birthday
Scrapbook PhD #14: Three Die Cut & add a little sparkle
Seize the Birthday: Anything Goes
The Three Muses Challenge: Friends
Word Art Wednsday 145: Anything Goes
I like your tutorial! I've been wanting to try this style but keep getting sidetracked. Very cute card!
ReplyDeleteLOVE the tut, Donna. Thanks for sharing. The image is just tooo CUTE. The card will be much appreciated.
ReplyDeletehugs, Asha
Bet Shirley really liked your card. The image is perfect and you
ReplyDeletedid a great job. Also like your tutorial and am planning on trying
it. Mom
Thank you so much for this tutorial Donna. I have tried it before but was not very successful. I will try your measurements. Your card is delightful, such a sweet image and pretty paper. Michelle x
ReplyDeleteA very cute card! Sweet image and beautiful patterned paper! Thank you for showing how you made this. It looks like something I could actually do!
ReplyDeleteand...I now have this sweet card on my desk - and it is amazing, love it - was able to spend some fun shopping time and breakfast with the creator yesterday so far this has been a great week. Thanks so much dear friend.
ReplyDeleteFabulous card and tutorial Donna..Loz
ReplyDeleteThis is a real great tribute to 'f'riendship for ever'.
ReplyDeleteYour card is splendid Donna! :)
adorable birthday card. Love the design of this. Thanks for sharing the details so I can try this kind of cut and fold! Thank you for playing along with us at DRS Designs this week!
ReplyDeleteThanks for sharing! It's inspirational to see people ying new designs and telling it wasn't all that hard! Your card turned out really sweet, I'm sure your friend appreciated it!
ReplyDeleteAlso, good luck in my candy draw!
These are really pretty cards! sure wish my fingers could still do the detail work involved....
ReplyDeleteThis is an adorable birthday card! I love all those pretty patterned papers and the fun sentiment. Thanks so much for joining us at Seize the Birthday!
ReplyDeletetwo little cutie pie Image and thanks for the tutorial, but I have no cutting machine also I will cut it by my self Donna..and what a sweet card you made Donna...
ReplyDeleteI miss to visit you I am sorry...It was start 12 August we went to Baltic sea but then my MIL getting worst on hospital also we go back earlier to munich....I wish she will not be longer to feel ill and sick I will alwayss pray for her and hope God listen to my pray...Amen...hugs, Monika
Cute card! Thanks for the tutorial too. Thanks for joining us at ScrapbookerPhD
ReplyDeleteHugs,
Julie T
I just love you amazing card. I must try this technique! TFS! Beautiful!
ReplyDeleteHugs,
Marie
Thank you for writing out the directions. I have never been able to make this fold. It looks terrific. Thank you for joining our challenge at ScrapbookerPhD.
ReplyDelete